
Forms, aka interactive forms, provide a way for site visitors to contact you.
This contact can be as simple as the Contact form that comes with every SimpleUpdates website. Which asks for:
When the form is submitted, an email is sent to the email address(es) that has been designated in the form settings.
Forms can also be quite elaborate, like an application or a signup form.
The Form Builder has three basic sections
The very first field. Called Form Title. Above the big green plus sign.
Click the big green plus sign to add a new field. There are several field types to choose from .
.
By default the type of field you choose will also be the field name. Change the name as appropriate for your need.
Indicate whether or not this is a required field by checking - or not checking - the Required option. Not Required is the default. Because Submissions are emailed, an Email field should be required. If a Submission doesn't make sense without a specific piece of information, require it. However, because the form will not submit unless all the required fields are filled in, you will want to keep required fields to a minimum.
Optionally, you may add placeholder text by clicking the word 'Advanced' and adding the placeholder text in the field provided.
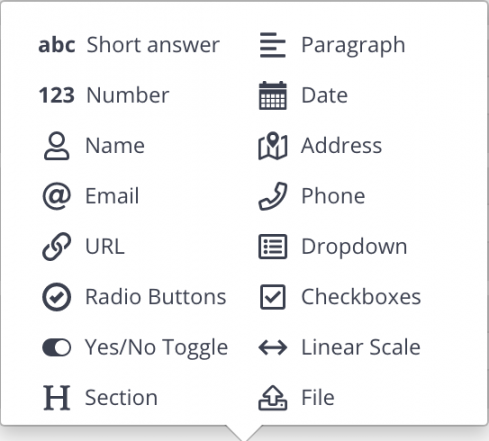
Short Answer is a field with a character limit. Use this field when you expect an answer of a few words
Paragraph allows a longer answer / explanation
Number will only accept numbers in the field
A Date can be entered in mm/dd/yyyy format or the user can choose the date from a popup calendar
The Name field is a two part field. First Name and Last Name
Address is a four part field. Address, City, State and Zip are listed as four separate fields.
The Email field verifies that the entry is in email format. It does not verify that the email entered is an actual email address
Phone is for a phone number
URL accepts a website address
Dropdown fields allow you to suggest possible answers. It also limits the answers to choosing from a list. This allows you to more easily analyze and / or categorize responses
Radio Buttons allow you to offer a list to choose from. It will only allow one answer
Checkboxes also allow you to offer a list to choose from. This list is a 'check all that apply' type of list
Yes/No Toggle will provide a quick radio button option for when the response is a simple Yes or No
The Linear Scale offers a five radio button rating scale from Strongly Disagree to Strongly Agree.
The Section field is an option that lets you offer an explanation or instructions for a section of questions or a single question. Insert a Section field to clarify parts of the form. You may type a message in the box provided that will display on the form in the Public view.
Your form is able to accept file attachments. Use the File field option to add this function to your form.
Keep in mind that uploaded files will NOT be scanned for viruses by the website email process. If a form submission - especially the file - appears questionable in any way, do not open it.
Click in the Email Notifications field to choose to whom the email notifications of a form submission should be sent. The options are taken from the Users list. If you want someone to receive notifications that does not otherwise edit the website, set them up as a Correspondent. They do not need to login, but it allows them to be a notification recipient.
Once a form has been submitted it is helpful to the site visitor to receive a notification that their submission was successful. There are two ways you can do this.
If you have integrated your website with the Credit Card Processor Stripe, you may also include a fee that will be charged upon submission of the form. For example: A signup form for a seminar could include the cost of the seminar to be paid with signup.
This is a simple option that only allows one charge amount per form. If you need more than one charge amount, you can use more than one form. Contact our office for more information is this is your need. 269.473.3687
Click and drag the cross that is left of the field to rearrange the form.
Click the [Edit] button of a specific field to
Click [Done] when you've completed your edit(s).
You may also edit Settings
Once a form is created, you will want it where website visitors can find it and use it. For instructions, please see the Adding a Form page.
To the right of the Form [Edit] button is a down arrow. Click this arrow to either Delete a form or Copy a form.
Copying a form can be especially handy if you have several forms that are very similar. Make a copy, then edit the copy rather than starting new. Be sure to give it a new name so you can tell the difference between all the similar forms!
Step one is integrating your website with reCAPTCHA. This integration HIGHLY recommended. If you do not integrate with reCAPTCHA, none of your form submissions will be emailed. You will instead get an email stating that someone has submitted a form, but you will have to login to your website to see it.
( See instructions for setting up a reCAPTCHA account )
Ideally, the form recipient would get an emailed copy of every legitimate form submission. Unfortunately, email is tricky. Not only are there too many people that are happy to use automated ways to clog up your inbox with spam, there are also spam filters that don't always get it right. At best spam filters occasionally deliver legitimate email to your spam folder. At worst they toss it into cyberspace where it digitally roams like Jacob Marley's ghost from Christmas Past.
SimpleUpdates has created a way to track your form responses even if they don't end up in your inbox.
It is recommended that you routinely view your Form Responses online just to verify you haven't missed anything important.
Above the list of responses is an option to search for a specific response. There are also four status links. In parenthesis it will tell you how many responses are in that list. Click to view the specific list.
Responses - This is the default view. It includes all the form submissions from the Form you are viewing except Spam.
Unread - unread form submissions
Unexported - You may export the list to a spreadsheet. There are a number of reasons a spreadsheet may be easier to work with than the responses list. If you have a signup form for example, a spreadsheet can be very useful.
In addition to the [Export] button that you use to export the above described spreadsheet, There is a [Copy to Collection] button you may use to populate a Custom Collection. Please call for more information if you are interested in a Custom Collection. 269.473.3687
Spam - SimpleUpdates has setup specific criteria to further protect you from Spam.
reCAPTCHA is great at identifying and rejecting form submissions by automated bots. However, If a real person fills out your form it does not reject the submission based on content.
SimpleUpdates takes an additional look at the submission and if certain characteristics are in the submission, it will put it in the Spam section of Viewing Forms, but will not send you an emailed notification.
It is recommended that you check for legitimate email that gets put in your Spam list by mistake.
Individual form submissions can be viewed in their entirety by clicking the [View] button. To the right of the [View] button is a down arrow. For responses, this down arrow will allow you to mark the submission as spam or delete it. When viewing Spam, the down arrow will allow you to mark the submission as not spam or delete it.
There is also a [Delete All Spam] button in the Spam list.
Each form has an option to view an analysis report based on the fields in the form.